
1

1234567891012345678910111213141516171819202122


 1234567891012345678910111213141516171819202122
Hi Smogon!
The fact that Naganadel was banned remains to be a foregone conclusion. Hence, a legitimate argument could be made about new forms of TR offense (featuring Stakataka), HO(Sticky web and Tapu Koko screens) and Stall teams (Quagsire Amnesia + Curse) being now a force to be reckoned with. Reason being is that I felt the urge of wanting to elevate the Belly Drum + Drain Punch game. At first I intended to elevate the only reliable Belly Drum + Drain Punch user by that time: Chesnaught, but it ended up coming up short due to the fact that it could only outspeed positive natured base 120's by a single point. Upon conducting research, I soon came to realization that Kommo-o have received a major buff in USUM: Drain Punch.
Proof of peak [1933]
Highest score [**2012**]
Proof of peak [2012]
Recent peaks
Proof of peak [1952]
Proof of peak [1968]
Proof of peak [1988]
Proof of peak [2004]
The Team


This team fares pretty well against all kinds of teams ranging from full stall to cancer rain teams to hyper offense, while being particularly effective against both TR offense and Hyper Stall. Like any team it has a fair share of weaknesses and most likely has room for improvement, so rates and feedback are always appreciated. Even with the team's shortcomings, I've managed to stay on high ladder for a chunk of time, but it will all depend on whether the team is run exuberantly well or not.
Team Building Process
-------------------------
Team Breakdown
-------------------------
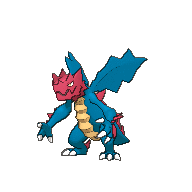
Kommo-o

Item: Salac berry
Ability: Bulletproof
EVs: 36 HP / 220 Atk / 252 Spe
Nature: Jolly (+Spe, -SpA)
• Drain Punch
• Thunder Punch / Earthquake
• Belly Drum
• Substitute
This Hyper Offensive team has been primarily built to showcase Kommo-o's offensive prowess; the rest of the team takes advantage evenly from its capabilities. Its ability Bulletproof is not a very useful bar negating ball and bomb moves, but taking into consideration that it provides immunities, albeit obscure, that may mean the difference between preserving and losing your Substitute. Keep in mind that half of the insane damage you're dealing with Drain Punch is HP gained to increase survivability and extend your sweep. Despite the fact that Earthquakeisn't a Stab move for Kommo-o, it can still hit relatively hard and can take on common fairy, ghost and poison type pokemons such as: Clefable, Tapu Koko, Toxapex, Mimikyu, etc,. While situational, Belly Drum maximizes Kommo-o's Attack stat by raising it to +6 stages while gaining +1 Stage of speed when Salac Berry activates at 1/4 HP after substitute. Thunder Punch can be run over Earthquake to shut down Flying type attackers (Mega Pinsir, Zapdos and Mantine) and Bulky Water types (Tapu Fini, Slowbro and Toxapex).
EV Spread - The 36 EV's in HP yield an HP stat of 300, meaning that your Salac Berry will activate after a Substitute and Belly Drum. At +1, max speed Kommo-o outspeeds the almighty Pheromosaby a single point, giving it the jump on the whole entire tier. This nice speed stat coupled with Kommo-o's respectable uninvested physical and special bulk makes Kommo-o relatively hard to get out from behind the Sub and revenge kill.
**Calcs**
Ditto

Item: Choice Scarf
Ability: Imposter
EVs: 252 HP / 4 Atk / 252 Def
Nature: Relaxed (+Def, -Spe)
IVs: 0 Spe
• Transform
• None
• None
• None
Ditto's purpose on this team is to patch up the team's terrible weaknesses to Sticky Web, Toxic Spikes and Choice Scarf users. Its ability to handle stall teams by copying recovery, hazard removal, and cleric support makes it a go-to transform for almost any slow pace Knock Off user, most notable: Mega Sableye.
**Mimikyu can also be run in this slot for a more offensive team against Non-Sticky Web teams**

Mimikyu

Item: Life Orb
Ability: Disguise
EVs: 252 Atk / 4 SpD / 252 Spe
Nature: Adamant (+Atk, -SpA)
• Play Rough
• Shadow Claw
• Sword Dance
• Shadow Sneak
The haunted decoy. Mimikyu is as amazing as it is kind of awful. Its fearsome STAB Play Roughoften fails to OHKO stuff like Kyurem-B Subzero Slammer and Mega Sableye, while Shadow Claw doesn't even come close to KOing Celesteela or Toxapex at +2 stages of attack. On the other hand, Mimikyu is incredibly manipulative and capable of clearing a path to victory for Kommo-o and the rest of my team. Tissue paper defenses is not very determinative since Mimikyu can act as a blanket check to many threats such as Volcarona and Mega Medicham. Finally, Shadow Sneak compensates Mimikyu's low Speed and is used to revenge kill faster threats.
EV Spread - An Adamant nature enables Mimikyu to do much more damage to Pokemon such as offensive Landorus-T and Celesteela, especially after a Swords Dance, and it is the preferred nature on Sticky Web teams.
Importable
**This slot can also be occupied by Gengar Choice Scarf to take advantage of the Trick + Cursed Body loop**

Gengar
Item: Choice Scarf
Ability: Cursed Body
EVs: 4 HP / 252 SpA / 252 Spe
Nature: Timid (+Spe, -Atk)
• Shadow Ball
• Sludge Wave
• Trick
• Focus Blast
Importable
Pinsir

Item: Pinsirite
Ability: Hyper Cutter
EVs: 252 Atk / 4 Def / 252 Spe
Nature: Jolly (+Spe, -SpA)
• Frustration
• Earthquake
• Sword Dance
• Quick Attack
Mega Pinsir is my Mega of choice, as it counters one of the most common scarf users: Kartana. It seems that standard and common Kartana teams are fully prepared to deal with Xurkitree and Bisharp, whether by being paired with Tapu Koko or running the SD Kartana Set. In the latter situation, Mega Pinsir has nothing to fear and can set up Sword Dance even in the face of Zapdos. When I am forced to set up Sword Dance on Zapdos, I can sacrifice an unwanted member of my team (usually Druddigon) to reliably cripple Zapdos with Z-Hypnosis Xurkitree, often clearing a path for Kommo-o to do whatever it wants. Mega Pinsir is also a reliable check to Disguise Mimikyu and plenty of other physical and special attackers like non-banded Zygarde and non-specs Keldeo. Considering my team can simply plow through opposing stall, Boosting support is an absolute necessity making it very difficult for the low pace team to be patch up the damage that has already been done. Mega Pinsir in itself is actually a fairly decent stall-breaker with nothing to envy from other megas.
Xurkitree

Item: Psychium z
Ability: Beast Boost
EVs: 4 Def / 252 SpA / 252 Spe
Nature: Timid (+Spe, -Atk)
• Thunderbolt
• Energy Ball
• Tail Glow
• Hypnosis
Xurkitree's frail bulk limits its attempts of getting a Tail Glow up, as most fairly strong attacks are bound to do a large amount of damage. Furthermore, it possesses a low Speed stat. This means that Tail Glow sets are going to be outsped and taken care of with ease by common Choice Scarf users such as: Latios, Landorus-T, Garchomp, Kartana, etc. It does, however, get access to certain Z-moves that can increase its Speed stat by one stage, including Z-Hypnosis and Z-Electric Terrain. Z-Hypnosis is more noticeable because of its ability to provide Xurkitree with an extra turn to set up a Tail Glow, something it truly appreciates because of its poor bulk. Nonetheless, with Beast Boost raising its Special Attack every time it gets a KO, it's still a potent late-game cleaner. Xurkitree is more notably known for its prosperity when it comes to wear down stall. With that being said, I highly recommend to be opportunist and put yourself in position to connect hypnosis, increase Xurkitree's absurb special attack stat by +3 stages and kick off the sweep spree.
EV Spread - Maximum Speed investment with Timid nature enables Xurkitree to outspeed Timid Mega Alakazam at +1 Speed, and it increases the odds of Xurkitree successfully using Hypnosis against Pokemon that may not invest fully in Speed, such as: Adamant Kyurem-B, Adamant Lando-T, Modest Tapu lele and so on. The given 56 HP to deal with Hawlucha's High Jump Kick, giving it a 18.8% to OHKO after Stealth Rocks damage.
Bisharp

Item: Black Glasses
Ability: Defiant
EVs: 252 Atk / 4 Def / 252 Spe
Nature: Adamant (+Atk, -SpA)
• Knock Off
• Sucker Punch
• Sword Dance
• Substitute
Bisharp's purpose on this team is to signal the end of days by going on a rampage and start picking off opposing pokemons with its hard hitting STAB move, a powerfull priotiy move and chanse to boost its attack. Substitute serves to become Bisharp into a go-to set up Substitute + Sword Dance whenever a pokemon is affected by paralysis. The fact bisharp may be getting one SD attempt plus the possibility of remaining subbed (if the opposing pokemon paralyzes 2 times) will only worsen things for your opponent as Bisharp can castigate with Sucker Punch at +2 attack, giving it even more opportunities of extending the sweep. At first glance it may look very situational and luck dependant, but if you show some level of optimism you can definitely benefit from things that cannot be seen on the naked eye.
EV Spread - Maximizes attack to render the additional wallbreaking power provided by an Adamant nature, which is generally a superior option as opposed to Jolly.
Druddigon
 /
/

Item: Mental Herb / Focus sash
Ability: Mold Breaker
EVs: 252 HP / 4 Def / 252 Spe
Nature: Timid (+Spe, -Atk)
Ivs: -19 Atk
• Taunt
• Glare
• Roar
• Stealth Rock
This set notoriously cruel to opposing stall teams and TR offense, usually turning the match-up in my favor. Druddigon is capable of setting up Stealth Rock with ease, ever since it has the Mold Breaker ability, which means that both Mega Diancie as Mega Sableye will not prevent Druddigon from setting up hazard effectively . Plus Druddigon has access to Glare, which affects common Ghost-type pokemons too, such as Blacephalon, Mimikyu, Gengar and Mega-Sableye. Ground type pokemons are also affected by Glare paralysis status, so getting to have the likes of Landorus-T, Excadrill and Garchomp paralyzed would only help you set up substitute + SD correctly. Although in Kommo-o's scenario, you will only have a 2 times chanse of the opposing pokemon paralyzing in order for you to take advantage of that gap and take it all. Druddigon is one of the few pokemons that have the privilege of thriving at the Roargame due to the Mold Breaker ability. The non-damaging moves: Taunt+Roar+Glare+Stealth rock can certainly give lots of players an awful fright. This marvelous movepool causes druddigon to perform at its highest, and Druddigon's held item is Focus Sash, meaning you will be enduring all of the 1hko moves while being able to paralyzed pretty much everything except for Electric type pokemon, causing Druddigon to uniquely be outsped by Mega Alakazam when all pokemons are paralyzed and Druddigon's nature is Jolly. Taunt over Gunk shot or Earthquake only to diminish defoggers potential, secure Hazard, negate Toxic Spikes and finally Roar facilitates a plausible multiple paralysis as Druddigon glare spam the upcoming pokemons. **Take in mind that the goal is not to paralyze as much pokemons as you can, if not to put yourself in a favorable position; meaning it is suggested to leave the opposing pokemon paralyzed as opposed to being Roar spamming**
EV Spread - 252 HP provides Druddigon with endurance to hard hitting moves. 252 Spe and Timid nature enables Druddigon to outspeed fast pokemons under the 146 BS Spe. Timid nature and 19 Atk Ivs to diminish Foul Play damage.
**Before BP was banned from the OU tier, Druddigon was once run as the main Hazard Setter of the Popular Druddigon BP. It's game was able to disrupt Stall. The paralysis caused by Druddigon helped Scolipede to make use of the Speed boost ability smoothly and passed this augmented speed stages to the next sweeper on the line**
Druddigon BP [Not available in the OU Metagame]


Importable
-------------------------
Threats
-------------------------

 Ash-Greninja
I normally don't allow Greninja to transform into Ash-Greninja, but if by any chance it does, make sure to gamble pretty well the Ditto usage. Plus you opt to paralyze Ash-greninja with Glare from Druddigon. Kommo-o is the one to be sent out to make front to Ash-Greninja, as it gets a free substitute since greninja can't help but switch out against Kommo-o.
 Mega-Pinsir
I highly recommend to keep Ditto on the shelf because it can potentially cripples Mega-Pinsir and disrupt its augmented attack. If Mega Pinsir is being coupled with a Sticky Web user, your best asnwer is to switch into Ditto when the Sticky Web user is on the battlefield, this way you can set up Sticky Web as well as your team benefits equally from the speed drop on the opponent's side of the field.
 Hawlucha
In this case, it is suggested that you manage to make as much damage as you can to shorten Hawlucha's HP, so that you cripple Hawlucha with priotity moves in Quick Attack from Mega Pinsir and Sucker Punch from Bisharp. Once all of that has passed, in a 1v1 match the pokemon to switch in to is Xurkitree, as its 56 HP would allow it to wall a single hit from HJK after rocks damage and so that Xurkitree can pick off Hawlucha with ease using Thunderbolt. Ditto would be useless against Hawlucha as Unburden give the opposing Hawlucha the jump on Choice Scarf Ditto.
 Tapu Lele (Choice Scarf)
Against Tapu Lele is always advised to cripple it with Glare, as some Tapu Leles will want to diminish Druddigon's possibilities of setting up Hazard. If not so, make sure to set up rocks, as it will be contantly switching it will be taking damage and ditto can cripple Tapu Lele Choice Scarf in many occasions once it is weakened. Also there are times when Tapu Lele locks up into a psychic type move, enabling Bisharp to switch in and safely get a free substitute as Tapu Lele can't help but switch out.
 Magearna (Trick Room)
In worst case scenario, if Magearna uses Trick Room, what you can do is you can gamble a little bit by sending out different pokemons (depending on its cruciality) as Trick Room turns comsume. Ditto is highly recommended to be sent out as it castigates Magearna enough as to put her in position be defeated by Earthquake from Pinsir. This set of Magearna can also be crippled by using Z-Hipnosys from Xurkitree.
 Tapu Koko
The way I handle Tapu Koko is would normally send out Xurkitree (since it is unable to use Z-Hypnosis due to Electric Terrain) and try to shorten Tapu Koko's HP the most I can. After that, priotity moves from Bisharp and Pinsir would get the job done. Other way to finish Tapu Koko up is to take advantage while Tapu Koko is not on the field and try to set up Belly Drum Kommo-o on stuff like Ferrothorn, Ash-Greninja and Pelipper.
Replays
With Xurkitree/Ditto
https://replay.pokemonshowdown.com/gen7ou-668188674
https://replay.pokemonshowdown.com/gen7ou-668063420
https://replay.pokemonshowdown.com/gen7ou-667153572
https://replay.pokemonshowdown.com/gen7ou-666176315
https://replay.pokemonshowdown.com/gen7ou-666160736
With Mimikyu/Xurkitree
https://replay.pokemonshowdown.com/gen7ou-667153572
https://replay.pokemonshowdown.com/gen7ou-667121458
https://replay.pokemonshowdown.com/gen7ou-667119012
https://replay.pokemonshowdown.com/gen7ou-667111662
https://replay.pokemonshowdown.com/gen7ou-667103200
https://replay.pokemonshowdown.com/gen7ou-667101461
https://replay.pokemonshowdown.com/gen7ou-667099399
With Tapu Koko/Hawlucha
https://replay.pokemonshowdown.com/gen7ou-666651106
https://replay.pokemonshowdown.com/gen7ou-666558825
With Gengar/Xurkitree
https://replay.pokemonshowdown.com/gen7ou-665960174
https://replay.pokemonshowdown.com/gen7ou-665936590
https://replay.pokemonshowdown.com/gen7ou-665911695
https://replay.pokemonshowdown.com/gen7ou-665903400
https://replay.pokemonshowdown.com/gen7ou-665760013
https://replay.pokemonshowdown.com/gen7ou-665746172
**Importable**
Shoutouts
Variants of the team
Kommo-o Belly drum HO - [Featuring Omastar Hazard setter + Zygarde Iapapa + Azelf screens][Brand new variant!][Do not miss out!]


Importable
Kommo-o Belly Drum HO - [Featuring Mimikyu]
Importable
Kommo-o Belly Drum HO [Gengar]

Importable
Kommo-o Belly Drum HO [Tapu Koko + Hawlucha Core]


Importable
Kommo-o Belly Drum Sun Team[Rates and feedback are appreciated] [UPDATED]


BluntSpear contributed
Replay
https://replay.pokemonshowdown.com/gen7ou-668905182
Importable
Kommo-o Belly Drum Rain Team [Rates and Feedbacks are appreciated] [UPDATED]


Importable
The flip side of the coin...
Kyurem Hyper Stall (Peaked #8)[1998]


Importable
Proof of peak

Double Blob Hyper Stall (Peaked #13)[1970]


Importable
Proof of peak

1234567891012345678910111213141516171819202122
Hi Smogon!
The fact that Naganadel was banned remains to be a foregone conclusion. Hence, a legitimate argument could be made about new forms of TR offense (featuring Stakataka), HO(Sticky web and Tapu Koko screens) and Stall teams (Quagsire Amnesia + Curse) being now a force to be reckoned with. Reason being is that I felt the urge of wanting to elevate the Belly Drum + Drain Punch game. At first I intended to elevate the only reliable Belly Drum + Drain Punch user by that time: Chesnaught, but it ended up coming up short due to the fact that it could only outspeed positive natured base 120's by a single point. Upon conducting research, I soon came to realization that Kommo-o have received a major buff in USUM: Drain Punch.
Proof of peak [1933]
Highest score [**2012**]
Proof of peak [2012]
Battle of peak
https://replay.pokemonshowdown.com/gen7ou-670424964
https://replay.pokemonshowdown.com/gen7ou-670424964
Recent peaks
- 1943
- 1952
- 1968
- 1988
- 2004
- *2012**
Battle of peak
https://replay.pokemonshowdown.com/gen7ou-669218845
https://replay.pokemonshowdown.com/gen7ou-669218845
Proof of peak [1952]
Battle of peak
https://replay.pokemonshowdown.com/gen7ou-669228494
https://replay.pokemonshowdown.com/gen7ou-669228494
Proof of peak [1968]
Battle of peak
https://replay.pokemonshowdown.com/gen7ou-669536299
https://replay.pokemonshowdown.com/gen7ou-669536299
Proof of peak [1988]
Battle of peak
https://replay.pokemonshowdown.com/gen7ou-669694795
https://replay.pokemonshowdown.com/gen7ou-669694795
Proof of peak [2004]
Battle of peak
https://replay.pokemonshowdown.com/gen7ou-669697156
https://replay.pokemonshowdown.com/gen7ou-669697156
The Team
This team fares pretty well against all kinds of teams ranging from full stall to cancer rain teams to hyper offense, while being particularly effective against both TR offense and Hyper Stall. Like any team it has a fair share of weaknesses and most likely has room for improvement, so rates and feedback are always appreciated. Even with the team's shortcomings, I've managed to stay on high ladder for a chunk of time, but it will all depend on whether the team is run exuberantly well or not.
Team Building Process
Many would speculate that I built this team around Druddigon, but this time around this is not the case, because I believe in Druddigon Hazard Setter being already elevated at least on the Hazard Setter slot. The whole team commenced out of an urge I had about elevating a Belly Drum + Drain Punch attacker (Found out Kommo-o gets Drain Punch in USUM) while STILL making Druddigon look fearful. I soon came to a realization that Druddigon can guarantee hazard when facing stall and prevents Trick Room from happening since it runs Roar and Trick Room has a priority of -7, so will be used after all moves with a normal priority. Also the Kommo-o's set I am running includes substitute, which could help you set up Belly Drum without taking any damage or being affected by status condition. The paralysis caused by Druddigon can help Kommo-o set up Belly Drum smoothly, reason of why this duo comes hand in hand.

Then I thought that it would be convenient to add yet another Pokemon taking advantage of the paralysis. Reason being is that this pokemon could commence the battle picking off frail attackers or bulky slow tempo pokemons by boosting its attack when being subbed. Bisharp is my unique full substitute offense in this team.


Ever since I already had the starting trio of the Hazard Setter + Paralysis in Druddigon, the potent physical attacker that can heal up its own HP in Kommo-o and the potent physical attacker using substitute + boost + Sucker Punch priority in Bisharp, it brought me to the foregone conclusion of wanting to add a potent attacker in the Special attack end that can repel Hawlucha and its borderline broken ability: Unburden and at the same time can help dismantle stall teams in general. In the wake of this I added 56 HP / 200 SpA / 252 Spe Xurkitree.
But then I saw that Sticky Web could put this 3 hard hitting attackers at its mercy. Reason being that I added ditto for good. Ditto contributes in copying Sticky Web and cut off the momentum of a boosting opposing pokemon. It can also generates switch outs which can most likely can put you in position to capitalize if you're good at the prediction gamble.


And last but surely not least, Mega Pinsir is my most important line of offense.

Then I thought that it would be convenient to add yet another Pokemon taking advantage of the paralysis. Reason being is that this pokemon could commence the battle picking off frail attackers or bulky slow tempo pokemons by boosting its attack when being subbed. Bisharp is my unique full substitute offense in this team.
Ever since I already had the starting trio of the Hazard Setter + Paralysis in Druddigon, the potent physical attacker that can heal up its own HP in Kommo-o and the potent physical attacker using substitute + boost + Sucker Punch priority in Bisharp, it brought me to the foregone conclusion of wanting to add a potent attacker in the Special attack end that can repel Hawlucha and its borderline broken ability: Unburden and at the same time can help dismantle stall teams in general. In the wake of this I added 56 HP / 200 SpA / 252 Spe Xurkitree.
But then I saw that Sticky Web could put this 3 hard hitting attackers at its mercy. Reason being that I added ditto for good. Ditto contributes in copying Sticky Web and cut off the momentum of a boosting opposing pokemon. It can also generates switch outs which can most likely can put you in position to capitalize if you're good at the prediction gamble.
And last but surely not least, Mega Pinsir is my most important line of offense.
-------------------------
Team Breakdown
-------------------------
Kommo-o
Item: Salac berry
Ability: Bulletproof
EVs: 36 HP / 220 Atk / 252 Spe
Nature: Jolly (+Spe, -SpA)
• Drain Punch
• Thunder Punch / Earthquake
• Belly Drum
• Substitute
This Hyper Offensive team has been primarily built to showcase Kommo-o's offensive prowess; the rest of the team takes advantage evenly from its capabilities. Its ability Bulletproof is not a very useful bar negating ball and bomb moves, but taking into consideration that it provides immunities, albeit obscure, that may mean the difference between preserving and losing your Substitute. Keep in mind that half of the insane damage you're dealing with Drain Punch is HP gained to increase survivability and extend your sweep. Despite the fact that Earthquakeisn't a Stab move for Kommo-o, it can still hit relatively hard and can take on common fairy, ghost and poison type pokemons such as: Clefable, Tapu Koko, Toxapex, Mimikyu, etc,. While situational, Belly Drum maximizes Kommo-o's Attack stat by raising it to +6 stages while gaining +1 Stage of speed when Salac Berry activates at 1/4 HP after substitute. Thunder Punch can be run over Earthquake to shut down Flying type attackers (Mega Pinsir, Zapdos and Mantine) and Bulky Water types (Tapu Fini, Slowbro and Toxapex).
EV Spread - The 36 EV's in HP yield an HP stat of 300, meaning that your Salac Berry will activate after a Substitute and Belly Drum. At +1, max speed Kommo-o outspeeds the almighty Pheromosaby a single point, giving it the jump on the whole entire tier. This nice speed stat coupled with Kommo-o's respectable uninvested physical and special bulk makes Kommo-o relatively hard to get out from behind the Sub and revenge kill.
**Calcs**
Damage with Drain Punch
+6 220 Atk Kommo-o Drain Punch vs. 200 HP / 0 Def Magearna: 376-444 (107.1 - 126.4%) -- guaranteed OHKO
----------------------------------------------------------------------------------------------------------
+6 220 Atk Kommo-o Drain Punch vs. 252 HP / 216+ Def Landorus-Therian: 168-198 (43.9 - 51.8%) -- guaranteed 3HKO after Leftovers recovery
--------------------------------------------------------------------------------------------------------------------
+6 220 Atk Kommo-o Earthquake vs. 0 HP / 0 Def Tapu Koko: 864-1018 (307.4 - 362.2%) -- guaranteed OHKO
--------------------------------------------------------------------------------------------------------------------
+6 220 Atk Kommo-o Drain Punch vs. 0 HP / 0 Def Latios: 255-300 (84.7 - 99.6%) -- 81.3% chance to OHKO after Stealth Rock
--------------------------------------------------------------------------------------------------------------------
+6 220 Atk Kommo-o Drain Punch vs. 248 HP / 8 Def Zapdos: 240-283 (62.6 - 73.8%) -- guaranteed 2HKO after Stealth Rock and Leftovers recovery
--------------------------------------------------------------------------------------------------------------------
+6 220 Atk Kommo-o Drain Punch vs. 248 HP / 252+ Def Skarmory: 241-285 (72.3 - 85.5%) -- guaranteed 2HKO after Stealth Rock
--------------------------------------------------------------------------------------------------------------------
+6 220 Atk Kommo-o Drain Punch vs. 0 HP / 4 Def Tapu Bulu: 187-221 (66.5 - 78.6%) -- guaranteed 2HKO after Grassy Terrain recovery
--------------------------------------------------------------------------------------------------------------------
+6 220 Atk Kommo-o Drain Punch vs. 248 HP / 0 Def Muk-Alola: 538-634 (130.2 - 153.5%) -- guaranteed OHKO
--------------------------------------------------------------------------------------------------------------------
+6 220 Atk Kommo-o Drain Punch vs. 252 HP / 132+ Def Celesteela: 331-391 (83.1 - 98.2%) -- 68.8% chance to OHKO after Stealth Rock
Damage with Earthquake
+6 220 Atk Kommo-o Earthquake vs. 248 HP / 8 Def Tapu Fini: 332-391 (96.7 - 113.9%) -- 81.3% chance to OHKO
--------------------------------------------------------------------------------------------------------------------
+6 220 Atk Kommo-o Earthquake vs. 252 HP / 192+ Def Toxapex: 418-494 (137.5 - 162.5%) -- guaranteed OHKO
-----------------------------------------------------------------------------------------------------
+6 220 Atk Kommo-o Earthquake vs. 0 HP / 0 Def Tapu Lele: 478-563 (170.1 - 200.3%) -- guaranteed OHKO
-----------------------------------------------------------------------------------------------------
Damage with Thunder Punch
+6 252 Atk Kommo-o Thunder Punch vs. 252 HP / 192+ Def Toxapex: 322-380 (105.9 - 125%) -- guaranteed OHKO
-----------------------------------------------------------------------------------------------------
+6 252 Atk Kommo-o Thunder Punch vs. 248 HP / 8 Def Tapu Fini: 510-602 (148.6 - 175.5%) -- guaranteed OHKO
-----------------------------------------------------------------------------------------------------
+6 252 Atk Kommo-o Thunder Punch vs. 0 HP / 4 Def Pinsir-Mega: 496-584 (183 - 215.4%) -- guaranteed OHKO
-----------------------------------------------------------------------------------------------------
+6 252 Atk Kommo-o Thunder Punch vs. 248 HP / 8 Def Zapdos: 329-388 (85.9 - 101.3%) -- guaranteed OHKO after Stealth Rock
-----------------------------------------------------------------------------------------------------
+6 252 Atk Kommo-o Thunder Punch vs. 252 HP / 216+ Def Slowbro: 402-474 (102 - 120.3%) -- guaranteed OHKO
-----------------------------------------------------------------------------------------------------
+6 252 Atk Kommo-o Thunder Punch vs. 0 HP / 0 Def Tapu Lele: 368-434 (130.9 - 154.4%) -- guaranteed OHKO
-----------------------------------------------------------------------------------------------------
+6 252 Atk Kommo-o Thunder Punch vs. 0 HP / 0 Def Tapu Koko in Electric Terrain: 249-294 (88.6 - 104.6%) -- guaranteed OHKO after Stealth Rock
Ditto
Item: Choice Scarf
Ability: Imposter
EVs: 252 HP / 4 Atk / 252 Def
Nature: Relaxed (+Def, -Spe)
IVs: 0 Spe
• Transform
• None
• None
• None
Ditto's purpose on this team is to patch up the team's terrible weaknesses to Sticky Web, Toxic Spikes and Choice Scarf users. Its ability to handle stall teams by copying recovery, hazard removal, and cleric support makes it a go-to transform for almost any slow pace Knock Off user, most notable: Mega Sableye.
**Mimikyu can also be run in this slot for a more offensive team against Non-Sticky Web teams**
Mimikyu
Item: Life Orb
Ability: Disguise
EVs: 252 Atk / 4 SpD / 252 Spe
Nature: Adamant (+Atk, -SpA)
• Play Rough
• Shadow Claw
• Sword Dance
• Shadow Sneak
The haunted decoy. Mimikyu is as amazing as it is kind of awful. Its fearsome STAB Play Roughoften fails to OHKO stuff like Kyurem-B Subzero Slammer and Mega Sableye, while Shadow Claw doesn't even come close to KOing Celesteela or Toxapex at +2 stages of attack. On the other hand, Mimikyu is incredibly manipulative and capable of clearing a path to victory for Kommo-o and the rest of my team. Tissue paper defenses is not very determinative since Mimikyu can act as a blanket check to many threats such as Volcarona and Mega Medicham. Finally, Shadow Sneak compensates Mimikyu's low Speed and is used to revenge kill faster threats.
EV Spread - An Adamant nature enables Mimikyu to do much more damage to Pokemon such as offensive Landorus-T and Celesteela, especially after a Swords Dance, and it is the preferred nature on Sticky Web teams.
Importable
Mimikyu @ Life Orb
Ability: Disguise
EVs: 252 Atk / 4 Def / 252 Spe
Adamant Nature
- Play Rough
- Shadow Claw
- Swords Dance
- Shadow Sneak
Ability: Disguise
EVs: 252 Atk / 4 Def / 252 Spe
Adamant Nature
- Play Rough
- Shadow Claw
- Swords Dance
- Shadow Sneak
**This slot can also be occupied by Gengar Choice Scarf to take advantage of the Trick + Cursed Body loop**
Gengar
Item: Choice Scarf
Ability: Cursed Body
EVs: 4 HP / 252 SpA / 252 Spe
Nature: Timid (+Spe, -Atk)
• Shadow Ball
• Sludge Wave
• Trick
• Focus Blast
Importable
Gengar @ Choice Scarf
Ability: Cursed Body
EVs: 4 HP / 252 SpA / 252 Spe
Timid Nature
IVs: 0 Atk
- Shadow Ball
- Sludge Wave
- Trick
- Focus Blast
Ability: Cursed Body
EVs: 4 HP / 252 SpA / 252 Spe
Timid Nature
IVs: 0 Atk
- Shadow Ball
- Sludge Wave
- Trick
- Focus Blast
Pinsir
Item: Pinsirite
Ability: Hyper Cutter
EVs: 252 Atk / 4 Def / 252 Spe
Nature: Jolly (+Spe, -SpA)
• Frustration
• Earthquake
• Sword Dance
• Quick Attack
Mega Pinsir is my Mega of choice, as it counters one of the most common scarf users: Kartana. It seems that standard and common Kartana teams are fully prepared to deal with Xurkitree and Bisharp, whether by being paired with Tapu Koko or running the SD Kartana Set. In the latter situation, Mega Pinsir has nothing to fear and can set up Sword Dance even in the face of Zapdos. When I am forced to set up Sword Dance on Zapdos, I can sacrifice an unwanted member of my team (usually Druddigon) to reliably cripple Zapdos with Z-Hypnosis Xurkitree, often clearing a path for Kommo-o to do whatever it wants. Mega Pinsir is also a reliable check to Disguise Mimikyu and plenty of other physical and special attackers like non-banded Zygarde and non-specs Keldeo. Considering my team can simply plow through opposing stall, Boosting support is an absolute necessity making it very difficult for the low pace team to be patch up the damage that has already been done. Mega Pinsir in itself is actually a fairly decent stall-breaker with nothing to envy from other megas.
Xurkitree
Item: Psychium z
Ability: Beast Boost
EVs: 4 Def / 252 SpA / 252 Spe
Nature: Timid (+Spe, -Atk)
• Thunderbolt
• Energy Ball
• Tail Glow
• Hypnosis
Xurkitree's frail bulk limits its attempts of getting a Tail Glow up, as most fairly strong attacks are bound to do a large amount of damage. Furthermore, it possesses a low Speed stat. This means that Tail Glow sets are going to be outsped and taken care of with ease by common Choice Scarf users such as: Latios, Landorus-T, Garchomp, Kartana, etc. It does, however, get access to certain Z-moves that can increase its Speed stat by one stage, including Z-Hypnosis and Z-Electric Terrain. Z-Hypnosis is more noticeable because of its ability to provide Xurkitree with an extra turn to set up a Tail Glow, something it truly appreciates because of its poor bulk. Nonetheless, with Beast Boost raising its Special Attack every time it gets a KO, it's still a potent late-game cleaner. Xurkitree is more notably known for its prosperity when it comes to wear down stall. With that being said, I highly recommend to be opportunist and put yourself in position to connect hypnosis, increase Xurkitree's absurb special attack stat by +3 stages and kick off the sweep spree.
EV Spread - Maximum Speed investment with Timid nature enables Xurkitree to outspeed Timid Mega Alakazam at +1 Speed, and it increases the odds of Xurkitree successfully using Hypnosis against Pokemon that may not invest fully in Speed, such as: Adamant Kyurem-B, Adamant Lando-T, Modest Tapu lele and so on. The given 56 HP to deal with Hawlucha's High Jump Kick, giving it a 18.8% to OHKO after Stealth Rocks damage.
Bisharp
Item: Black Glasses
Ability: Defiant
EVs: 252 Atk / 4 Def / 252 Spe
Nature: Adamant (+Atk, -SpA)
• Knock Off
• Sucker Punch
• Sword Dance
• Substitute
Bisharp's purpose on this team is to signal the end of days by going on a rampage and start picking off opposing pokemons with its hard hitting STAB move, a powerfull priotiy move and chanse to boost its attack. Substitute serves to become Bisharp into a go-to set up Substitute + Sword Dance whenever a pokemon is affected by paralysis. The fact bisharp may be getting one SD attempt plus the possibility of remaining subbed (if the opposing pokemon paralyzes 2 times) will only worsen things for your opponent as Bisharp can castigate with Sucker Punch at +2 attack, giving it even more opportunities of extending the sweep. At first glance it may look very situational and luck dependant, but if you show some level of optimism you can definitely benefit from things that cannot be seen on the naked eye.
EV Spread - Maximizes attack to render the additional wallbreaking power provided by an Adamant nature, which is generally a superior option as opposed to Jolly.
Druddigon
Item: Mental Herb / Focus sash
Ability: Mold Breaker
EVs: 252 HP / 4 Def / 252 Spe
Nature: Timid (+Spe, -Atk)
Ivs: -19 Atk
• Taunt
• Glare
• Roar
• Stealth Rock
This set notoriously cruel to opposing stall teams and TR offense, usually turning the match-up in my favor. Druddigon is capable of setting up Stealth Rock with ease, ever since it has the Mold Breaker ability, which means that both Mega Diancie as Mega Sableye will not prevent Druddigon from setting up hazard effectively . Plus Druddigon has access to Glare, which affects common Ghost-type pokemons too, such as Blacephalon, Mimikyu, Gengar and Mega-Sableye. Ground type pokemons are also affected by Glare paralysis status, so getting to have the likes of Landorus-T, Excadrill and Garchomp paralyzed would only help you set up substitute + SD correctly. Although in Kommo-o's scenario, you will only have a 2 times chanse of the opposing pokemon paralyzing in order for you to take advantage of that gap and take it all. Druddigon is one of the few pokemons that have the privilege of thriving at the Roargame due to the Mold Breaker ability. The non-damaging moves: Taunt+Roar+Glare+Stealth rock can certainly give lots of players an awful fright. This marvelous movepool causes druddigon to perform at its highest, and Druddigon's held item is Focus Sash, meaning you will be enduring all of the 1hko moves while being able to paralyzed pretty much everything except for Electric type pokemon, causing Druddigon to uniquely be outsped by Mega Alakazam when all pokemons are paralyzed and Druddigon's nature is Jolly. Taunt over Gunk shot or Earthquake only to diminish defoggers potential, secure Hazard, negate Toxic Spikes and finally Roar facilitates a plausible multiple paralysis as Druddigon glare spam the upcoming pokemons. **Take in mind that the goal is not to paralyze as much pokemons as you can, if not to put yourself in a favorable position; meaning it is suggested to leave the opposing pokemon paralyzed as opposed to being Roar spamming**
EV Spread - 252 HP provides Druddigon with endurance to hard hitting moves. 252 Spe and Timid nature enables Druddigon to outspeed fast pokemons under the 146 BS Spe. Timid nature and 19 Atk Ivs to diminish Foul Play damage.
**Before BP was banned from the OU tier, Druddigon was once run as the main Hazard Setter of the Popular Druddigon BP. It's game was able to disrupt Stall. The paralysis caused by Druddigon helped Scolipede to make use of the Speed boost ability smoothly and passed this augmented speed stages to the next sweeper on the line**
Druddigon BP [Not available in the OU Metagame]
Importable
Necrozma @ Weakness Policy
Ability: Prism Armor
EVs: 252 HP / 144 Def / 112 Spe
Bold Nature
IVs: 0 Atk
- Stored Power
- Moonlight
- Calm Mind
- Iron Defense
Scolipede (M) @ Black Sludge
Ability: Speed Boost
Shiny: Yes
EVs: 248 HP / 8 Def / 252 Spe
Jolly Nature
- Baton Pass
- Megahorn
- Protect
- Substitute
Manaphy @ Sitrus Berry
Ability: Hydration
EVs: 16 HP / 252 SpA / 240 Spe
Modest Nature
IVs: 0 Atk
- Surf
- Energy Ball
- Tail Glow
- Ice Beam
Espeon (F) @ Kee Berry
Ability: Magic Bounce
EVs: 252 HP / 224 Def / 32 Spe
Bold Nature
IVs: 0 Atk
- Stored Power
- Morning Sun
- Calm Mind
- Dazzling Gleam
Mawile @ Mawilite
Ability: Intimidate
EVs: 252 Atk / 4 Def / 252 Spe
Adamant Nature
- Play Rough
- Thunder Punch
- Swords Dance
- Fire Fang
Druddigon (M) @ Focus Sash
Ability: Mold Breaker
EVs: 252 HP / 4 Def / 252 Spe
Timid Nature
IVs: 19 Atk
- Taunt
- Glare
- Roar
- Stealth Rock
-------------------------
Threats
-------------------------
I normally don't allow Greninja to transform into Ash-Greninja, but if by any chance it does, make sure to gamble pretty well the Ditto usage. Plus you opt to paralyze Ash-greninja with Glare from Druddigon. Kommo-o is the one to be sent out to make front to Ash-Greninja, as it gets a free substitute since greninja can't help but switch out against Kommo-o.
I highly recommend to keep Ditto on the shelf because it can potentially cripples Mega-Pinsir and disrupt its augmented attack. If Mega Pinsir is being coupled with a Sticky Web user, your best asnwer is to switch into Ditto when the Sticky Web user is on the battlefield, this way you can set up Sticky Web as well as your team benefits equally from the speed drop on the opponent's side of the field.
In this case, it is suggested that you manage to make as much damage as you can to shorten Hawlucha's HP, so that you cripple Hawlucha with priotity moves in Quick Attack from Mega Pinsir and Sucker Punch from Bisharp. Once all of that has passed, in a 1v1 match the pokemon to switch in to is Xurkitree, as its 56 HP would allow it to wall a single hit from HJK after rocks damage and so that Xurkitree can pick off Hawlucha with ease using Thunderbolt. Ditto would be useless against Hawlucha as Unburden give the opposing Hawlucha the jump on Choice Scarf Ditto.
Against Tapu Lele is always advised to cripple it with Glare, as some Tapu Leles will want to diminish Druddigon's possibilities of setting up Hazard. If not so, make sure to set up rocks, as it will be contantly switching it will be taking damage and ditto can cripple Tapu Lele Choice Scarf in many occasions once it is weakened. Also there are times when Tapu Lele locks up into a psychic type move, enabling Bisharp to switch in and safely get a free substitute as Tapu Lele can't help but switch out.
In worst case scenario, if Magearna uses Trick Room, what you can do is you can gamble a little bit by sending out different pokemons (depending on its cruciality) as Trick Room turns comsume. Ditto is highly recommended to be sent out as it castigates Magearna enough as to put her in position be defeated by Earthquake from Pinsir. This set of Magearna can also be crippled by using Z-Hipnosys from Xurkitree.
The way I handle Tapu Koko is would normally send out Xurkitree (since it is unable to use Z-Hypnosis due to Electric Terrain) and try to shorten Tapu Koko's HP the most I can. After that, priotity moves from Bisharp and Pinsir would get the job done. Other way to finish Tapu Koko up is to take advantage while Tapu Koko is not on the field and try to set up Belly Drum Kommo-o on stuff like Ferrothorn, Ash-Greninja and Pelipper.
Replays
With Xurkitree/Ditto
https://replay.pokemonshowdown.com/gen7ou-668188674
https://replay.pokemonshowdown.com/gen7ou-668063420
https://replay.pokemonshowdown.com/gen7ou-667153572
https://replay.pokemonshowdown.com/gen7ou-666176315
https://replay.pokemonshowdown.com/gen7ou-666160736
With Mimikyu/Xurkitree
https://replay.pokemonshowdown.com/gen7ou-667153572
https://replay.pokemonshowdown.com/gen7ou-667121458
https://replay.pokemonshowdown.com/gen7ou-667119012
https://replay.pokemonshowdown.com/gen7ou-667111662
https://replay.pokemonshowdown.com/gen7ou-667103200
https://replay.pokemonshowdown.com/gen7ou-667101461
https://replay.pokemonshowdown.com/gen7ou-667099399
With Tapu Koko/Hawlucha
https://replay.pokemonshowdown.com/gen7ou-666651106
https://replay.pokemonshowdown.com/gen7ou-666558825
With Gengar/Xurkitree
https://replay.pokemonshowdown.com/gen7ou-665960174
https://replay.pokemonshowdown.com/gen7ou-665936590
https://replay.pokemonshowdown.com/gen7ou-665911695
https://replay.pokemonshowdown.com/gen7ou-665903400
https://replay.pokemonshowdown.com/gen7ou-665760013
https://replay.pokemonshowdown.com/gen7ou-665746172
**Importable**
Druddigon (M) @ Focus Sash
Ability: Mold Breaker
EVs: 252 HP / 4 Def / 252 Spe
Timid Nature
IVs: -19 Atk
- Taunt
- Glare
- Roar
- Stealth Rock
Bisharp @ Black Glasses
Ability: Defiant
EVs: 252 Atk / 4 Def / 252 Spe
Adamant Nature
- Knock Off
- Sucker Punch
- Swords Dance
- Substitute
Xurkitree @ Psychium Z
Ability: Beast Boost
EVs: 4 Def / 252 SpA / 252 Spe
Timid Nature
IVs: 0 Atk
- Thunderbolt
- Energy Ball
- Tail Glow
- Hypnosis
Pinsir @ Pinsirite
Ability: Hyper Cutter
Happiness: 0
EVs: 252 Atk / 4 Def / 252 Spe
Jolly Nature
- Frustration
- Earthquake
- Swords Dance
- Quick Attack
Ditto @ Choice Scarf
Ability: Imposter
EVs: 252 HP / 4 Atk / 252 Def
Relaxed Nature
IVs: 0 Spe
- Transform
Kommo-o @ Salac Berry
Ability: Bulletproof
EVs: 36 HP / 220 Atk / 252 Spe
Jolly Nature
- Drain Punch
- Thunder Punch
- Belly Drum
- Substitute
Shoutouts
DianaZaldivar❤
CamilaCruz❤
storm zone
manols
Crime♡
annakartana0
dia_sre
Fantastic_fuego
ilosetostalloroffense
Idud
nintendonoah
ZombieFriedChicken
Predator 30
Dark Elegy
hkjjljih
Austin Whitaker
StayHighAllTheTime
CamilaCruz❤
storm zone
manols
Crime♡
annakartana0
dia_sre
Fantastic_fuego
ilosetostalloroffense
Idud
nintendonoah
ZombieFriedChicken
Predator 30
Dark Elegy
hkjjljih
Austin Whitaker
StayHighAllTheTime
Variants of the team
Kommo-o Belly drum HO - [Featuring Omastar Hazard setter + Zygarde Iapapa + Azelf screens][Brand new variant!][Do not miss out!]
Importable
Omastar @ Focus Sash
Ability: Weak Armor
EVs: 4 Def / 252 SpA / 252 Spe
Timid Nature
IVs: 0 Atk
- Surf
- Spikes
- Shell Smash
- Stealth Rock
Zygarde @ Iapapa Berry
Ability: Aura Break
EVs: 160 HP / 216 Atk / 28 SpD / 104 Spe
Adamant Nature
- Thousand Arrows
- Extreme Speed
- Coil
- Dragon Dance
Azelf @ Light Clay
Ability: Levitate
EVs: 252 HP / 4 Def / 252 Spe
Jolly Nature
- Taunt
- Reflect
- Light Screen
- U-turn
Pinsir @ Pinsirite
Ability: Hyper Cutter
Happiness: 0
EVs: 252 Atk / 4 Def / 252 Spe
Jolly Nature
- Frustration
- Earthquake
- Swords Dance
- Quick Attack
Xurkitree @ Psychium Z
Ability: Beast Boost
EVs: 4 Def / 252 SpA / 252 Spe
Timid Nature
IVs: 0 Atk
- Thunderbolt
- Energy Ball
- Tail Glow
- Hypnosis
Kommo-o @ Salac Berry
Ability: Bulletproof
EVs: 36 HP / 220 Atk / 252 Spe
Jolly Nature
- Drain Punch
- Thunder Punch
- Belly Drum
- Substitute
Kommo-o Belly Drum HO - [Featuring Mimikyu]
Importable
Druddigon (M) @ Focus Sash
Ability: Mold Breaker
EVs: 252 HP / 4 Def / 252 Spe
Timid Nature
IVs: 19 Atk
- Taunt
- Glare
- Roar
- Stealth Rock
Bisharp @ Black Glasses
Ability: Defiant
EVs: 252 Atk / 4 Def / 252 Spe
Adamant Nature
- Knock Off
- Sucker Punch
- Swords Dance
- Substitute
Xurkitree @ Psychium Z
Ability: Beast Boost
EVs: 4 Def / 252 SpA / 252 Spe
Timid Nature
IVs: 0 Atk
- Thunderbolt
- Energy Ball
- Tail Glow
- Hypnosis
Mimikyu @ Life Orb
Ability: Disguise
EVs: 252 Atk / 4 Def / 252 Spe
Adamant Nature
- Play Rough
- Shadow Claw
- Swords Dance
- Shadow Sneak
Pinsir @ Pinsirite
Ability: Hyper Cutter
Happiness: 0
EVs: 252 Atk / 4 Def / 252 Spe
Jolly Nature
- Frustration
- Earthquake
- Swords Dance
- Quick Attack
Kommo-o @ Salac Berry
Ability: Bulletproof
EVs: 36 HP / 220 Atk / 252 Spe
Jolly Nature
- Drain Punch
- Thunder Punch
- Belly Drum
- Substitute
Kommo-o Belly Drum HO [Gengar]
Importable
Druddigon (M) @ Focus Sash
Ability: Mold Breaker
EVs: 252 HP / 4 Def / 252 Spe
Timid Nature
IVs: 19 Atk
- Taunt
- Glare
- Roar
- Stealth Rock
Bisharp @ Black Glasses
Ability: Defiant
EVs: 252 Atk / 4 Def / 252 Spe
Adamant Nature
- Knock Off
- Sucker Punch
- Swords Dance
- Substitute
Xurkitree @ Psychium Z
Ability: Beast Boost
EVs: 56 HP / 200 SpA / 252 Spe
Timid Nature
IVs: 0 Atk
- Thunderbolt
- Energy Ball
- Tail Glow
- Hypnosis
Gengar @ Choice Scarf
Ability: Cursed Body
EVs: 4 HP / 252 SpA / 252 Spe
Timid Nature
IVs: 0 Atk
- Shadow Ball
- Sludge Wave
- Trick
- Focus Blast
Pinsir @ Pinsirite
Ability: Hyper Cutter
Happiness: 0
EVs: 252 Atk / 4 Def / 252 Spe
Jolly Nature
- Frustration
- Earthquake
- Swords Dance
- Quick Attack
Kommo-o @ Salac Berry
Ability: Bulletproof
EVs: 36 HP / 220 Atk / 252 Spe
Jolly Nature
- Drain Punch
- Thunder Punch
- Belly Drum
- Substitute
Importable
Druddigon (M) @ Focus Sash
Ability: Mold Breaker
EVs: 252 HP / 4 Def / 252 Spe
Timid Nature
IVs: 19 Atk
- Taunt
- Glare
- Roar
- Stealth Rock
Bisharp @ Black Glasses
Ability: Defiant
EVs: 252 Atk / 4 Def / 252 Spe
Adamant Nature
- Knock Off
- Sucker Punch
- Swords Dance
- Substitute
Tapu Koko @ Electrium Z
Ability: Electric Surge
EVs: 252 SpA / 4 SpD / 252 Spe
Timid Nature
- Thunderbolt
- Grass Knot
- Taunt
- U-turn
Hawlucha @ Electric Seed
Ability: Unburden
EVs: 104 HP / 252 Atk / 152 Spe
Adamant Nature
IVs: 30 Spe
- Swords Dance
- Acrobatics
- High Jump Kick
- Drain Punch
Pinsir @ Pinsirite
Ability: Hyper Cutter
Happiness: 0
EVs: 252 Atk / 4 Def / 252 Spe
Jolly Nature
- Frustration
- Earthquake
- Swords Dance
- Quick Attack
Kommo-o @ Salac Berry
Ability: Bulletproof
EVs: 36 HP / 220 Atk / 252 Spe
Jolly Nature
- Drain Punch
- Thunder Punch
- Belly Drum
- Substitute
Kommo-o Belly Drum Sun Team[Rates and feedback are appreciated] [UPDATED]
BluntSpear contributed
Replay
https://replay.pokemonshowdown.com/gen7ou-668905182
Importable
Kartana @ Normalium Z
Ability: Beast Boost
Shiny: Yes
EVs: 252 HP / 4 Def / 252 Spe
Timid Nature
IVs: 19 Atk
- Leaf Blade
- Sacred Sword
- Swords Dance
- Giga Impact
Cresselia @ Heat Rock
Ability: Levitate
EVs: 248 HP / 252 Def / 8 SpD
Relaxed Nature
IVs: 0 Atk / 0 Spe
- Ice Beam
- Moonlight
- Lunar Dance
- Sunny Day
Houndoom @ Houndoominite
Ability: Flash Fire
EVs: 252 SpA / 4 SpD / 252 Spe
Timid Nature
- Flamethrower
- Dark Pulse
- Nasty Plot
- Flame Charge
Victreebel @ Life Orb
Ability: Chlorophyll
EVs: 252 SpA / 4 SpD / 252 Spe
Modest Nature
IVs: 0 Atk
- Solar Beam
- Weather Ball
- Growth
- Sleep Powder
Torkoal @ Heat Rock
Ability: Drought
EVs: 248 HP / 252 Def / 8 SpD
Bold Nature
IVs: 0 Atk
- Lava Plume
- Toxic
- Rapid Spin
- Stealth Rock
Kommo-o @ Salac Berry
Ability: Bulletproof
EVs: 36 HP / 220 Atk / 252 Spe
Jolly Nature
- Drain Punch
- Thunder Punch
- Belly Drum
- Substitute
Kommo-o Belly Drum Rain Team [Rates and Feedbacks are appreciated] [UPDATED]
Importable
Swampert @ Swampertite
Ability: Damp
EVs: 252 Atk / 4 Def / 252 Spe
Adamant Nature
- Waterfall
- Earthquake
- Ice Punch
- Power-Up Punch
Pelipper @ Damp Rock
Ability: Drizzle
EVs: 248 HP / 32 Def / 228 SpD
Bold Nature
- Scald
- Roost
- Defog
- U-turn
Kingdra @ Choice Specs
Ability: Swift Swim
EVs: 4 HP / 252 SpA / 252 Spe
Modest Nature
- Hydro Pump
- Surf
- Draco Meteor
- Hidden Power [Electric]
Kartana @ Steelium Z
Ability: Beast Boost
Shiny: Yes
EVs: 252 HP / 4 Def / 252 Spe
Timid Nature
IVs: 19 Atk
- Leaf Blade
- Smart Strike
- Sacred Sword
- Swords Dance
Uxie @ Red Card
Ability: Levitate
EVs: 252 HP / 116 Def / 140 SpD
Impish Nature
- Memento
- Rain Dance
- U-turn
- Stealth Rock
Kommo-o @ Salac Berry
Ability: Bulletproof
EVs: 36 HP / 220 Atk / 252 Spe
Jolly Nature
- Drain Punch
- Thunder Punch
- Belly Drum
- Substitute
The flip side of the coin...
Kyurem Hyper Stall (Peaked #8)[1998]
Importable
Skarmory (F) @ Rocky Helmet
Ability: Sturdy
EVs: 252 HP / 252 Def / 4 SpD
Impish Nature
IVs: 0 Atk
- Whirlwind
- Roost
- Defog
- Spikes
Toxapex (F) @ Black Sludge
Ability: Regenerator
EVs: 252 HP / 194 Def / 62 SpD
Bold Nature
IVs: 0 Atk
- Scald
- Recover
- Toxic Spikes
- Haze
Clefable (F) @ Leftovers
Ability: Unaware
EVs: 252 HP / 252 Def / 4 SpD
Bold Nature
IVs: 0 Atk
- Moonblast
- Wish
- Protect
- Heal Bell
Sableye (M) @ Sablenite
Ability: Prankster
EVs: 252 HP / 252 Def / 4 SpD
Impish Nature
- Protect
- Recover
- Will-O-Wisp
- Knock Off
Chansey @ Eviolite
Ability: Natural Cure
EVs: 4 HP / 252 Def / 252 SpD
Impish Nature
IVs: 0 Atk
- Seismic Toss
- Soft-Boiled
- Toxic
- Stealth Rock
Kyurem @ Leftovers
Ability: Pressure
EVs: 252 HP / 124 Def / 132 SpD
Bold Nature
IVs: 0 Atk
- Ice Beam
- Roost
- Substitute
- Earth Power
Double Blob Hyper Stall (Peaked #13)[1970]
Importable
Skarmory @ Shed Shell
Ability: Sturdy
EVs: 252 HP / 252 Def / 4 SpD
Impish Nature
IVs: 0 Atk
- Whirlwind
- Roost
- Defog
- Spikes
Quagsire @ Leftovers
Ability: Unaware
EVs: 252 HP / 252 Def / 4 SpD
Relaxed Nature
- Scald
- Recover
- Toxic
- Earthquake
Chansey @ Eviolite
Ability: Natural Cure
EVs: 4 HP / 252 Def / 252 SpD
Bold Nature
IVs: 0 Atk
- Seismic Toss
- Soft-Boiled
- Toxic
- Stealth Rock
Toxapex @ Black Sludge
Ability: Regenerator
EVs: 252 HP / 194 Def / 62 SpD
Bold Nature
IVs: 0 Atk
- Scald
- Recover
- Toxic Spikes
- Haze
Sableye-Mega @ Sablenite
Ability: Prankster
EVs: 252 HP / 252 Def / 4 SpD
Impish Nature
- Protect
- Recover
- Will-O-Wisp
- Knock Off
Blissey @ Leftovers
Ability: Natural Cure
EVs: 252 HP / 252 Def / 4 SpD
Bold Nature
IVs: 0 Atk
- Seismic Toss
- Soft-Boiled
- Wish
- Heal Bell
Attachments


Last edited:


