Pokémon UNITE One Year Anniversary: What's Changed?
| « Previous Article | Next Article » |
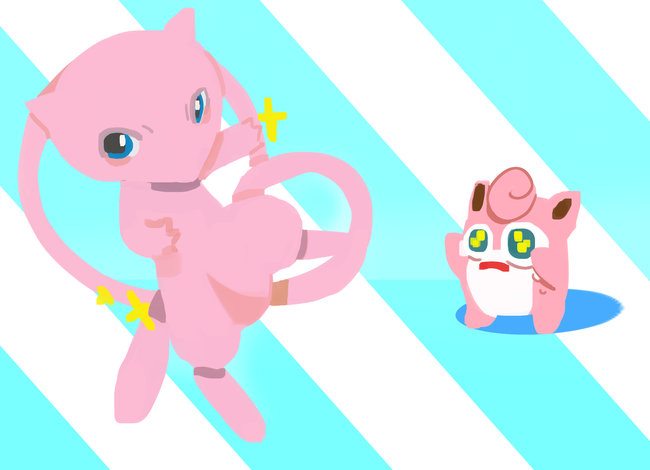
Art by Kiwi.
Introduction
Pokémon UNITE is a MOBA that focuses on teams of five players collecting Aeos Energy and scoring as much as possible, with the team that has the highest score winning. There are several classes and distinctions amongst the roster of playable Pokémon. For a refresher on these and a more in-depth overview, be sure to check out Theia's article written at the time of the release that covers the basics of the game.
Now that Pokémon UNITE has been released for over a year, it's time to take a look at what has changed! While the principle of the game, scoring the most points, is still the same, the methods that allow you to score the most points have changed vastly. Over the past year, the game has seen a giant increase in the availability of playable Pokémon, adjustments to crucial items, and most recently, boost emblems. Furthermore, players have developed and innovated better strategies. New resources have also been put together that help players better understand the metagame and each Pokémon. Combining all of these changes and new information has led to a landscape that is completely different from the time of the game's release.
The Map
Throughout all of Pokémon UNITE's lifetime, there was one map to play standard and ranked matches on: Remoat Stadium. This map was introduced upon the game's release and had been the staple to play on throughout the game's entire lifespan, as there was no other map to play on. However, after a year of the game being out, a new map was introduced: Theia Sky Ruins. The layout of Theia Sky Ruins has a few differences from Remoat Stadium, such as the placement of jungle objectives, but overall remains relatively similar. Notably, there are now Pokémon that spawn in the center of the map, whereas formerly nothing spawned in the center of the map until Zapdos spawned at the two-minute mark. Your side of the map still has three goalposts on the top and bottom lanes leading up to home base, a center area, and two objectives which spawn on the very top and very bottom of the map.
Objectives spawn in Pokémon UNITE: Regieleki in the top lane, or one of Regirock, Regice, or Registeel in the bottom lane. Prior to the 1.7.1.2 patch, which introduced Theia Sky Ruins, these objectives were instead Rotom in the top lane and Drednaw in the bottom lane. Upon your team defeating Regieleki, it will advance to the nearest goalpost standing on the opposing team's side, leaving it vulnerable to automatic scoring for 15 seconds should it reach the goalpost. This is similar to the previous objective, Rotom, which would also disable the opponent's goalpost, but for 25 seconds instead. Regirock, Regice, and Registeel are a bit different than Drednaw, however. Drednaw granted all teammates experience and a shield upon defeat. Instead of experience and shields, the new bottom lane objectives focus on buffing stats: Regirock buffs all teammates' Defense and Special Defense, Regice increases the speed of HP recovery, and Registeel buffs all teammates' Attack and Special Attack.
In the jungle, or center lane, there are two objectives that should be defeated: Accelgor and Escavalier. On Remoat Stadium, these objectives were equivalent to Ludicolo and Bouffalant. Defeating Accelgor will grant you a blue buff, which will lower the cooldown of your moves by 10%; defeating Escavalier will grant you a red buff, which will slightly increase damage dealt to opposing Pokémon and slightly decrease their movement speed when hit. Notably, Accelgor's buff will only grant the user 10% cooldown reduction compared to Ludicolo's 20% reduction.
The Roster
Since the game's release, the amount of playable Pokémon has increased from only 20 to a staggering 42 at the time of writing, with more on the horizon as well. Naturally, with such a large expansion of the roster, some Pokémon become outclassed by others, roles shift, and players have to adapt to the new additions. One example we can look at is Wigglytuff. During the early days of the game's release, Wigglytuff was quite a popular pick thanks to its excellent ability to support its teammates. However, with additions of other Supporters—most notably, Mr. Mime—Wigglytuff has unfortunately gotten lost in the mix and has fallen out of favor.
Fortunately, with so many new Pokémon being added, players have been given much more versatility in what can be run. Since you are in a team of five players, and duplicate Pokémon are not allowed on the same team, you now have a much wider range of what you are able to play. Considering initially there were only 20 Pokémon, if someone had selected the Pokémon you were hoping to play before you, then you were out of options and forced to play something else. Now, with so many Pokémon to pick from you have a much higher chance of being able to play whatever Pokémon you would like, or at least your second option hopefully.
Gameplay Adjustments and Developments
As Pokémon UNITE has grown and evolved, there have been adjustments made to both improve weaker strategies and nerf overpowered ones. One of the biggest changes the game has seen was the nerf to the item Buddy Barrier, which grants the user and nearby allies a shield when it uses a Unite move. Before it was nerfed, Buddy Barrier's shield effect was able to be stacked with all other shields, including those granted by other Buddy Barriers. This allowed teams to spam the item at important objective fights to overwhelm the opponent, or to grant large shields that allow Pokémon to score together. Nearly every Pokémon ran the item for these reasons. However, it was nerfed to no longer stack with other shields, eliminating these strategies. While this is a massive nerf, the item is still quite valuable and sees a lot of play because it provides a boost to HP alongside the shield, which still comes in handy. However, it's no longer a cornerstone of the metagame as it once was.
One of the other most notable adjustments came from player development. Around the time of release, players frequently complained that the final objective, Zapdos, dictated the game. Zapdos appears when there are two minutes in the game left, and upon your team defeating it, enemies are struck with lightning that stuns them briefly and all enemy goalposts are rendered defenseless, allowing you to score immediately. What's important about this is that once the game hits two minutes, it's considered "the final stretch," and all points are worth double. Thus, whoever won Zapdos was very likely to win, as they could score freely, and all of those scores count for double what they would for the eight minutes leading up to Zapdos's appearance.
However, after a year of using the primary map introduced to the game, Remoat Island, a new map became standard: Theia Sky Ruins. On this map, instead of defeating Zapdos as the final objective, players are now tasked with defeating Rayquaza. When Rayquaza spawns, air currents along certain points of the map also spawn that increase the player's movement speed while in their area. Upon defeating Rayquaza, instead of disabling enemy goalposts, all members of your team are granted a breakable shield, increased damage output, and increased scoring speed. It is worth nothing, however, that some Pokémon, such as Tyranitar, can automatically pierce the shield with certain moves. All points are still worth double, but instead of automatically being able to score, now players must think much quicker on their feet to ensure they can score without their shield being broken.
Hoopa
One particular addition to the roster has created an impact on the metagame unlike any other: Hoopa. In regards to Hoopa, the question is more what can't it do versus what can it do. Formerly, at the highest level of play, you could expect to see Hoopa on nearly every team, and for good reason. Hoopa had an unmatched capability of controlling the course of the game through its various tools.
Hoopa's kit is incredibly diverse, but the standout feature of Hoopa is its ability to warp teammates across the map. Hoopa has access to the ability Hyperspace Hole, a move which creates a circle of effect on the field that yourself and your teammates can stand on to teleport back to your home base to recover, then teleport back to the same spot if they choose to. Additionally, the move can be used on any of your goal zones which allows yourself and your teammates to teleport between them. Do note that this only applies to your most outward goal posts; for example, if placed on your second-tier goal post, Hoopa will teleport you to the most outward goal post on the opposing side of the map. You cannot teleport from a second-tier goal to a first-tier goal until the other second tier-goal has been broken.
The relevancy here is that this move allows your teammates to get out of tricky situations and heal themselves before returning to combat or leave the situation entirely and head somewhere else on the map from home base. Being able to teleport between goal posts is crucial as well. Objectives spawn in Pokémon UNITE that spawn on a timer, at the seven-minute mark in the match, and respawn two minutes after being defeated. These objectives are difficult, and both teams will want to go for them. Hoopa's Hyperspace Hole ability allows it to immediately bring its team from the top lane to the bottom lane to attack whichever Regi spawns, or vice versa to attack Rotom. Being at objectives as quickly as possible to prevent the opposing team from gaining their buffs is crucial, and no Pokémon is able to get the player's team to them as quickly as Hoopa can.
As if this move alone wasn't enough, Hoopa's Unite Move, Rings Unbound, transforms Hoopa into Hoopa-U. While in this state, Hoopa receives a massive buff to its HP and is granted two new moves: Hyperspace Fury and Psybeam. The former move creates a ring that launches punches and stuns the opposing Pokémon, while the latter grants Hoopa an immunity to hindrances and damages the opposing Pokémon. These moves are both excellent at crowd control, which is crucial because the most important effect that occurs upon transformation is the ability for all teammates to teleport immediately to Hoopa's location regardless of where they are on the map. This is particularly excellent for objectives, specifically the final objective: Rayquaza. Being able to bring your entire team into one place for a coordinated fight while also controlling the crowd with its abilities means that Hoopa's support to a team couldn't be understated.
Hoopa's heyday came to an end with the release of Theia Sky Ruins, however. Inherently, the map rewards players being more spaced out and focusing on various parts of the map. Furthermore, there was a nerf to the speed at which health is recovered in home base—one of the places Hoopa could teleport you to. With new mechanics and new developments such as these, Hoopa unfortunately fell from its spotlight as the most metagame-defining Pokémon to a much more niche selection for a team. Despite this, though, it absolutely deserves to be noted how important Hoopa was to the game.
Team Composition
As you only have five slots that you can fill on a team, using each of them carefully is crucial. Coordinating your team cohesively lends itself to your team having the highest success rate. Naturally, with time and vast changes being made to the game, players must keep up and figure out how best to structure their team composition.
In Pokémon UNITE, there are three lanes: the top lane, the center lane, and the bottom lane. Different Pokémon thrive in these lanes, and all have unique attributes. For example, the top lane is excellent for Pokémon that are able to overwhelm the opponent and is preferred for Pokémon that want to score small amounts in order to build stacks with items such as Attack Weight, while the center lane is best used for Pokémon that will output massive amounts of damage and want lots of experience to level up quickly. Early in the metagame, people would run a composition that focused on placing two Pokémon top lane, one Pokémon center lane, and two Pokémon bottom lane, often referred to as a 2-1-2 strategy. However, this strategy quickly evolved into a 1-1-3 pattern, moving one Pokémon from the top lane to the bottom lane.
The logic behind having a single Pokémon in the top lane is that there are specific Pokémon that are able to maintain both attacking, scoring, and defending the goal on their own while also getting all of the experience available rather than sharing it. For a long time, Lucario ran the top lane and was the most common Pokémon placed in this lane. However, things began to shift when Tsareena was released that led to a progression of more and more Pokémon being able to fill this role as well. Nowadays, Tsareena and Machamp are also seen as able to solo top lane. The common denominator with all three of these Pokémon is the item Attack Weight, which gives you additional boost to your Attack for every score you make. These Pokémon are able to quickly score, get out of combat, and hold their own if they do engage in combat.
However, with the release of Theia Sky Ruins, the 1-1-3 team composition has fallen out of favor and returned back to a 2-1-2 composition. Due to Theia Sky Ruins focusing on spread-out attacking and experience scattered more than Remoat Island did, it's unwise to leave a lane to a single Pokémon.
Pokémon primarily placed in the center lane have also seen a shift. Initially, you could expect to see a Speedster like Zeraora or an Attacker like Cinderace in this lane. While these Pokémon still see use in this role, now more Pokémon are able to take on this lane. One of the most notable examples is Dragonite, which has seen a huge uptick in center lane usage. This is because Dragonite has one of, if not the, best moves in the game to secure objectives: Hyper Beam. However, Dragonite doesn't unlock this move until it evolves at Level 8. By placing Dragonite in the center lane, you almost always ensure that you will have reached Level 8 by the time an objective spawns, which greatly helps your team in the long run.
Boost Emblems
The most recent addition to Pokémon UNITE, Boost Emblems, have added another layer of depth to the game that causes players to think more carefully about their builds and consider what would work best for each Pokémon. Boost Emblems all raise one stat while lowering another, and are tiered by bronze, silver, and gold classes, with each class gaining greater and greater boosts and debuffs. Once you have three bronze, or three silver, you can exchange Aeos Coins to upgrade them to the next highest rank. To boost an Emblem from bronze to silver is guaranteed, but to boost an Emblem from silver to gold has a 40% success rate. You will not lose the Emblems you try to upgrade should the upgrade fail.
However, what truly makes Boost Emblems influential is the color buff mechanic. Every Pokémon Boost Emblem has an assigned color—black, blue, brown, green, pink, purple, red, white, yellow, or navy. Each color provides a specific buff: black reduces Move Cooldown, blue increases Defense, brown increases Attack, green increases Special Attack, pink reduces the length of Hindrance durations, purple increases Special Defense, red increases Basic Attack Speed, white increases HP, yellow increases Movement Speed, and navy reduces Unite Move charge rate. The grade of the Emblem being equipped does not matter; the Emblem's color will always activate its effects. It is necessary to equip a certain number of Emblems of each color for their boosts to take effect, taking three stages to gain the full effect. This will vary from color to color. For example, it takes six green Emblems to activate their full effect, while it takes seven red Emblems to activate their full effect. Placing Emblems of the same Pokémon will only grant the stat buffs, and they will not apply to the color count. For example, using two Meowth Emblems, which are white, will only count as one boost to the white buff, not two. Each build of Pokémon Boost Emblems may only contain ten Emblems.
The system of Pokémon Boost Emblems is not as complex as it may appear, despite the loads of effects that have been described. The stats in Pokémon UNITE that will give you the most mileage are HP, Attack, and Special Attack, and Cooldown Reduction. On the other hand, Defense, Special Defense, Basic Attack Speed, Hindrance Resistance, and Movement Speed are all typically not worth having fully increased color boosts. Additionally, there are not enough pink or yellow emblems in the game to maximize their effects. When building a Pokémon Boost Emblem set, you must keep in what is most beneficial to the Pokémon you wish to play. Primarily, you will want to focus on getting the buffs from maximizing a color's effect, applying as many Emblems of that color possible.
One of the more notable colors to maximize is black, which grants increased Cooldown Reduction. At maximum, you are able to receive a 4% Cooldown Reduction on your moves. This requires seven black Emblems, which will take up seven of your ten available Emblems, but many black Emblems have secondary colors as well, which means you are able to still gain benefits of other colors. Most Pokémon benefit from Cooldown Reduction, so it is usually great to have black Emblems. These will be helpful on nearly every Pokémon. Another notable color to look into investing is white, as it will provide a 4% boost to your HP when maximized. This is preferable to maximizing blue or purple, because while these colors will boost your defenses, throughout the course of the match HP is a flat stat and will consistently be of benefit. Defense and Special Defense, however, end up being less significant as the match progresses due to how damage is calculated in Pokémon UNITE.
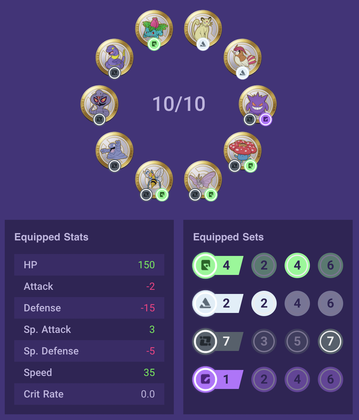
Green is a common secondary color on black Emblems, appearing on four of the available black Emblems. When four green Emblems are applied, a buff of 2% is applied to Special Attack. Thus, you can opt for this, or fill out two more of your available slots to hit six green Emblems, applying a buff of 4% to Special Attack. A setup like this is very useful to nearly every Special Attacker, as many naturally gain Cooldown Reduction as they level up. For example, Delphox gains a Cooldown Reduction of 25% once it reaches Level 15. Combining this with Emblems, you'll receive a 29% Cooldown Reduction. If that wasn't crazy enough, you can also add items that reduce Cooldown Reduction: Energy Amplifier, which provides a 4.5% reduction, and Shell Bell, which provides another 4.5% reduction. Put this all together and you'll receive a massive 38% Cooldown Reduction on your Delphox, in it addition to its ability, Mystical Fire+, which reduces Cooldown by one second when it hits. As you can imagine, by the time you've reached maximum Cooldown Reduction, you'll be able to fire out your abilities incredibly quickly, dishing out lots of damage. Do note that cooldown reduction will cap at 60% no matter what. Here is an example of a Pokémon Boost Emblem set that you could use for these effects:
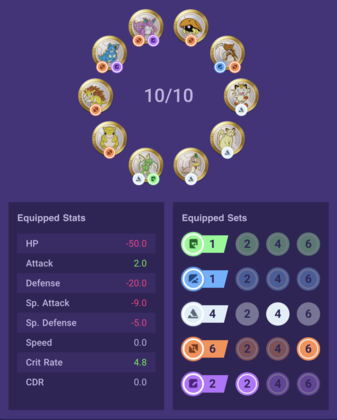
Emblems are also useful for physical attackers and tanks. These Pokémon can opt to run a few black Emblems for some Cooldown Reduction as well, though it may be preferred to focus on building brown and white Emblems, as these provide boosts to your Attack and HP. Plus, there are several white Emblems, which also increase critical hit rate; this is amazing, as every physical attacker bar Pokémon of the Defender class acquire inherit boosts to critical hit rate as they level up. The one exception to this is Azumarill, whose moves are all capable of landing a critical hit, so it still benefits from these boosts. Increasing both Attack and Critical Hit rate allows for physical attackers to dish out much more damage and gain an HP boost in the process. With six brown Emblems equipped, Attack is raised by 4%, and with four white Emblems equipped, HP is raised by 2%. Here is an example of a Pokémon Boost Emblem set that you could use for these effects:
Please note that obtaining gold emblems is difficult, and you will likely have mostly bronze with a handful of silver. These builds are merely to display the way you can organize colors for the maximal benefit; using the same Emblems as in these examples will yield the same result in color bonuses, regardless of their grade. This is the key takeaway: the color bonus is the most important focus.
Events
Pokémon UNITE has vastly increased the quantity of events since its release. Holowear, or skins that provide visual effects to a Pokémon, can often be accessed through completing events. Beyond Holowear, Pokémon themselves can be unlocked through events. One of the most recent additions to the roster, Mew, was able to be obtained through an event, for example. Both Holowear and Pokémon can be purchased using Aeos Gems as well, though some Holowear is specifically locked behind events and cannot be purchased.
Alongside Holowear and Pokémon being accessible with events, Pokémon UNITE has also made a huge improvement in one of the issues that was present upon its release: people weren't able to keep up because of how expensive it is to upgrade items and buy Unite licenses that are required to play a Pokémon. Initially, it was almost impossible to level up your items to Level 30, when they get the most benefit, putting you at a disadvantage against those who spent the money to buy Item Enhancers. However, events now reward many Item Enhancers and Aeos Coins, which are used to purchase Unite licenses. While it is still difficult to upgrade items, it is no longer at such a disparity where you had to pay to stand a chance in regards to upgraded items.
Resources
As with any game that has been released for long enough, players have compiled more and more resources for Pokémon UNITE. There are two primary resources players can turn to for information: Unite Api and Unite-DB.
Unite Api is a website that is best used to keep up to date with the metagame. It displays the most played Pokémon and highest winrates among Pokémon. Furthermore, it includes a complete listing of all Pokémon's stats and their preferred lanes. Through the website, you can also search for usernames to see player's battle records, including those on the leaderboard of the top 100 Unite players. This information is very helpful to contextualize the metagame and stay up to date on the current happenings.
Unite-DB is a database of Unite information on the game. Here, players can find detailed information on all Pokémon's movesets and what all of their abilities do, as well as all of their stats. You can use the website to create builds for your Pokémon and see how it impacts their stats, which is a great visual way of setting up builds. There is also an interactive map that allows you see where every Pokémon on the map spawns, when they will respawn, and any special effect that they might have. Lastly, the website features a detailed changelog of every patch the game goes through. It is a great introductory website for players to understand mechanics before jumping into the game. However, do note that the Tier List is not always accurate, as it is updated by usage rather than a team of players compiling it.
Final Thoughts
With countless changes over the course of the year, and time for player's to develop their skills, it's safe to say that UNITE is a much different game than it was upon initial release. While the end goal, score the most points, has remained consistent, the strategies and methods to actually achieve this goal have bounced around and continue to evolve. Do keep in mind that scoring is only possible when you have the opportunity to do so; attempting only to score is a poor idea. Score when you have defeated the opposition blocking the goal, or when the opposing team is distracted with an objective. The result of a match is determined by how much you score, but first you must actually reach a point to safely score, which requires much more thought than simply walking to an enemy's goalpost and trying to score over and over.
There's really no telling what the future of UNITE looks like. One buff is all it takes for a Pokémon to go from the bottom of the pack to a titan dictating the metagame—you never know!
| « Previous Article | Next Article » |