Chaining Pokemon with the Poké RadarIntroduction
Many of you might remember the key item in Pokémon Diamond, Pearl, and Platinum that was given to you for seeing all the Pokemon in the Sinnoh regional Pokédex, but fewer people know how to properly use it. This guide aims to teach you how to properly use the Poké Radar and chain Pokemon using information found in the game coding. What is it, and why should I?Chaining is the process of encountering the same Pokemon numerous times in a row. This is beneficial, because the higher your chain gets, the more likely it is to encounter a shiny Pokemon. As you may know, a shiny Pokemon is generally a 1/8192 chance of either encountering or hatching from an Egg (not taking Masuda method into account, or Shiny Charm from BW2). With chaining, the chances will max out at 1/200 chance per shaking patch when you get to a chain of 40 or more, and if you have 4 patches shake when you use the Poké Radar, that is 4/200 chance that you will find a shiny. Even to this day, chaining can be the easiest way to get a shiny Pokemon, and they can still be sent to any generation 4 or 5 game. Things you will need:
Deciding what to chainYou can't chain any Pokemon, but here is a checklist of what to look for when you think of a Pokemon to go after.
That's pretty much it, simple to remember those 2 things. Getting StartedAfter you chose what you want, you will want to go into the center of the grass area, so there is about 4 or more grass spaces to either side of you, including up and down, like so:  Remember to count the patch behind the Trainer's head. Switch to the Trainer Counter app (it's a pedestal with 3 spots, and it keeps track of your highest chains), use a Repel, set the Poké Radar to the Y button, and save your game. Important: Do not use your bicycle at all during chaining, it will break your chain. Next, you will want to press Y, and you will see some patches of grass shake, like so:  These patches seem to be in a random location, and some shake differently, but let's analyze them. 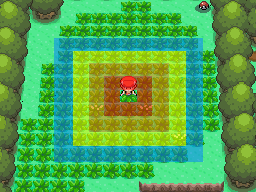 Here we have 4 zones. In each zone, the game will pick a tile, and if it is a patch of grass, it will shake. If it is not a patch of grass, that zone will not have a spot shake. The red zone is always 1 tile adjacent to the player (including the one their head is blocking from vision). The other zones border around each other, making a total of 4 zones, with the outermost one being 4 tiles up, left, right, or down from you.  Here, we can see 2 different types of grass shaking. There are 3 that have leaves jumping around, and one that just shakes gently. There isn't too much different about these to my knowledge. The ones with the leaves jumping are easier to see, but the animation ends quicker. The ones that shake gently are harder to see, but the animation lasts longer. You will want to walk into any of these patches, but remember what kind you walk into, because that is the kind you want to walk into during the whole chain. A wild battle will start. If it isn't the Pokemon you want, press L-R-Start-Select to do a soft reset and try again. When you encounter the Pokemon you want, you need to either catch or faint it to continue the chain. Be prepared to look closely after the screen fades out, because if your chain continues, you will hear the Poké Radar music again, and more patches will shake.  Remember the zones? Now it's important to take them into consideration. You will see your patches shake, and you want to take mental note of where they are, because each zone has a chance of continuing/breaking your chain.
NEVER, and I repeat, NEVER go into a patch of grass that is a different kind than what you started with unless it is a shiny patch (you will know, because it sort of shimmers and glows for a second). My recommendation for the patches is that if you don't see a patch shake of the type you started within the blue zone, carefully walk 50 steps, while avoiding the other patches, and press Y again. This is known as resetting your radar, and it will not break your chain. It will make new patches shake, so try to be in the center again when you press Y. If your repel runs out, immediately apply another one. A random wild battle will break your chain. Here's a neat find from looking at some of the game's ASM: If you faint a Pokemon, the patches that shake after the battle will have the chances listed above. However, if you catch the Pokemon, all of those chances will be increased by 10%, meaning that the blue zone will have a 98% chance to continue your chain. This is why it is recommended to stock up on Repeat Balls, and catch all the Pokemon you can. Do note that resetting the radar will negate the bonus 10%, so you will have to hope a good 4 away (blue zone) patch shakes right after the catch. Chain is at 40, now what?Now it is recommended to just be careful and reset your radar. You will come across a shiny in due time. Sometimes I would go through 60 or so Super Repels looking for a shiny, other times I might have used 5 before finding one. If you see the patch glow, carefully make your way to it while avoiding other patches. This will continue your chain as long as you catch or faint it. Since your chain continues, you can keep looking for shinies. I would usually get about 4 or 5 before stopping. After catching a shiny, save your game right away; that way if your chain breaks, you can load your file, saving a few Repels and Repeat Balls. Ways to break your chainHere is a list of things that will break your chain:
Tips for chaining:
Common MisconceptionsI have come across a few tutorials on chaining saying that there are bad formations, or formations that might trade probabilities between patches. These are all myths. After some research in the ASM of the game, I found no such case where this applied. Long story short, the patches have the percentages as listed in this guide, regardless of other patches touching them, or lack of patches touching each other. 6/1/18: A recent discovery by ShantyTown indicates that if a patch is set to break a chain, there is a 50/50 chance it will rustle as the opposite type. Taking this into account, avoiding the opposite patch types completely can give you a ~7% chance to make it to a chain of 40, without the capture boost. When switching patch types, the chain will only continue if the encountered Pokemon happens to be the same species. The chain will never break when encountering the same species in a patch of grass, UNLESS, the next four patches all happen to fall outside of the grass. If anything else is found, I will try to update this guide to be the most accurate one. Please spread the word of this guide by linking to it. Happy chaining. |